Building the Fact API
02 Mar 2021This is an incredibly long, boring, technical (and probably inaccurate) post. If the words Node, TypeScript or DigitalOcean bore you to death, just know I made something pretty and I’m incredibly proud of it. You can take a look at thefact.space.
Does anyone remember all the way back in November I mentioned I’d walk through building an open source project? I’m sure Adam remembers.
Well, I’m happy to let you know that time is now.
On Monday night, after a sudden burst of enthusiasm that I’m sure will not crash anytime soon (hah), I decided to build a Fact API that would dispense random nuggets of knowledge through a beautifully designed webpage (because graphic design is my passion) and a RESTful API. Here’s the end product.
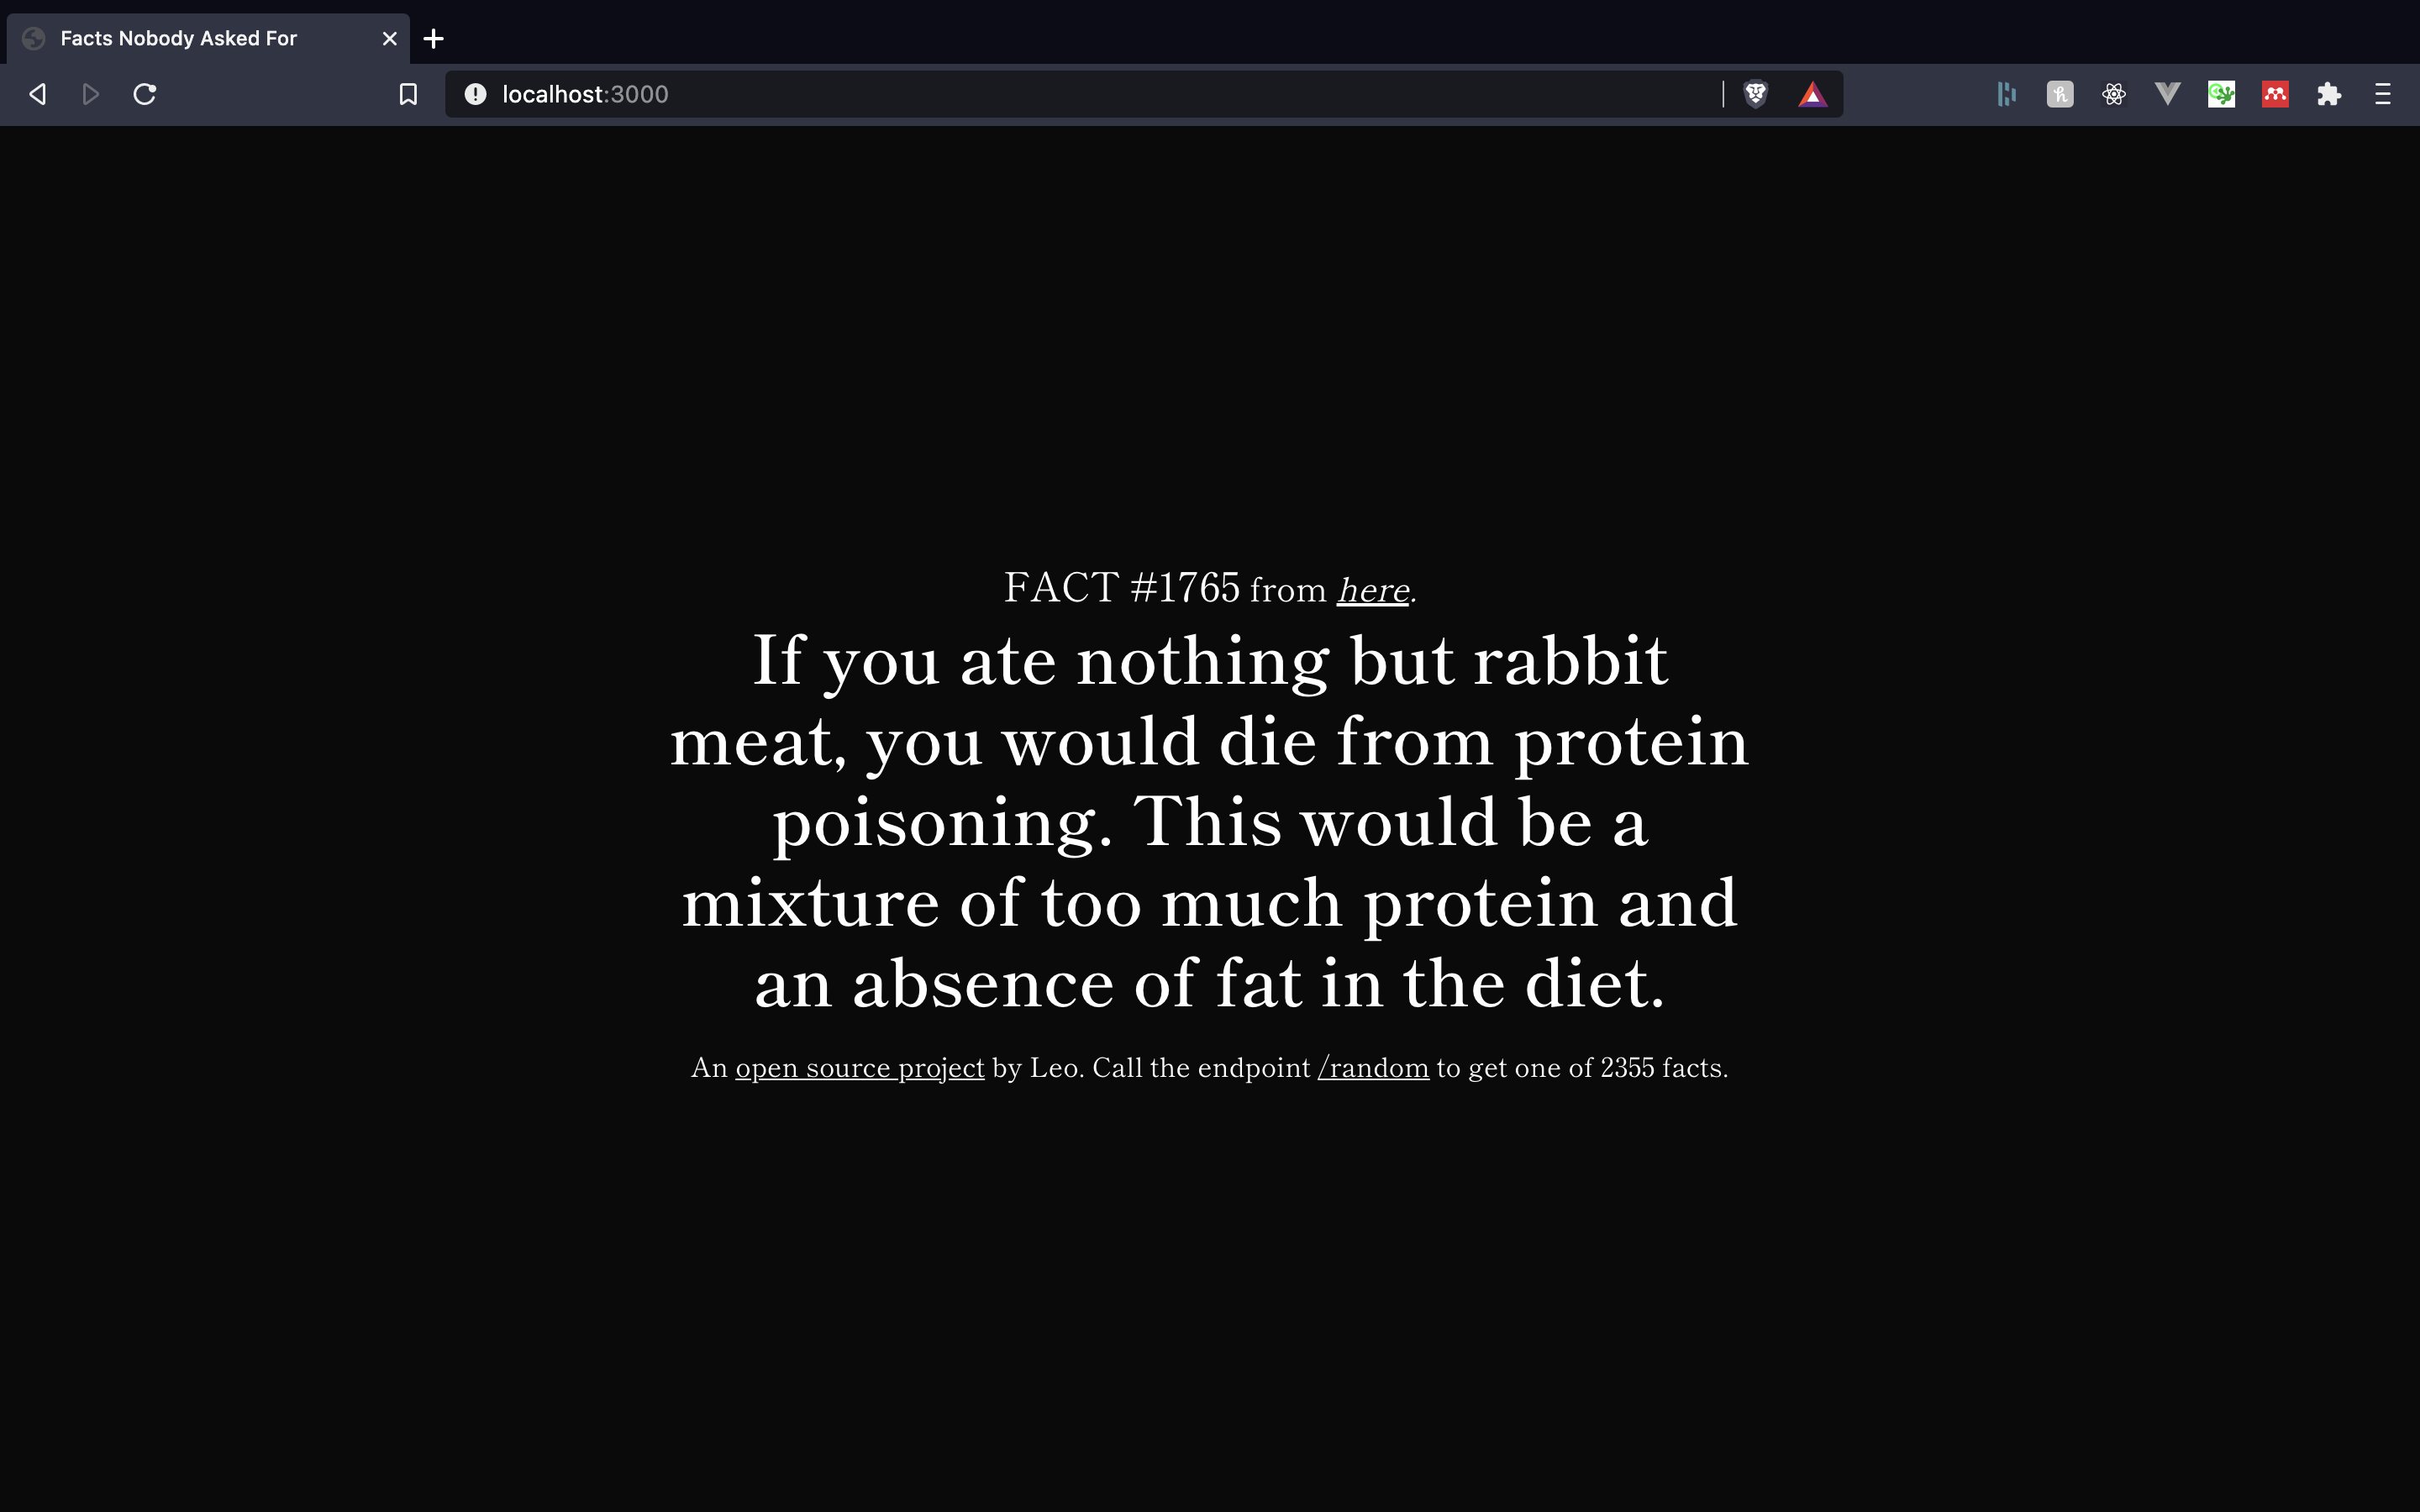
Isn’t The Fact Space an absolute beauty? The front-end and back-end are served by an ExpressJS server hosted on a DigitalOcean droplet, which was incredibly simple and quick to put together.
Let’s dive into how it works. This post will consider several design decisions made while putting together the site.
Step 1: Serving It
I used a Node server, rather than something written in Python or Haskell.
I’m more familiar with Node, as I already use it for work. Most of my job involves running OVH and GCP Node servers for my clients, and writing serverless infrastructure using Firebase Functions. If everything could be Node-based, as inefficient and painfully slow as it would be, I wouldn’t complain.
I love serverless architectures as they’re often cheaper to run (you only pay for what you use, versus server overhead), simpler to get started with and maintain in the long-term (you only need to write a few lines of code to have your first deploy) and allow easier onboarding of new team members (if everything’s documented properly, it’s simple to see how all the functions come together to make the app work).
In my experience, distilling the business logic of an app into independent ‘black boxes’ with clearly defined inputs and outputs allows faster development and deployment. Optimising one piece of an app only involves redeploying a single function, versus the whole app. Also, it’s good for start-ups who are trying to move quickly (several of which I have been part of!) as it eliminates the time, cost and expertise necessary to securely administer a server. All that’s offloaded onto someone else. An excellent article about server versus serverless from the Freetrade Engineering team is here.
Despite my love of serverless applications, doing that for a project as small as this would be overkill. As the content would be a random selection from an array full of facts served through a JSON endpoint or a webpage, a simple ExpressJS server would work.
Step 2: Speak the Language
I coupled the ExpressJS backend with TypeScript rather than JavaScript, simply because TypeScript is superior.
I’m incredibly fond of TypeScript and use it for all my Node web projects. It provides me with the flexibility to define interfaces as I develop them, so I can iterate incredibly quickly. This is especially useful when I’m working on small projects, where I’ll code first and plan later. I often find myself constantly rethinking and reworking my ideas, and a language which is statically typed can help me understand the ‘shape’ of the data I’m consuming.
On top of that, TypeScript allows me to build on top of other people’s code without worrying too much. Once types are properly defined, I’m able to easily import and build my app using other packages. I find typings much more accurate than documentation in some cases, as they’re embedded directly in the code and used by people who work with the library. If there’s an issue, it’ll be caught.
With TypeScript, there’s no way I can make a mistake and pass a value of the wrong type. This has saved me on several occasions, where my mind’s wandered off, I’ve typed in the wrong variable and TypeScript highlights my mistake with an angry, red line under it. It’s definitely made more a more confident programmer, allowing me to focus more on semantics rather than syntax.
I don’t want to gush over TypeScript too much, but it does take self-documenting code to another level. (Even though, yes, self-documenting code doesn’t exist and all code should come with clearly written comments.)
Step 3: Fast Facts from the Internet
After identifying my infrastructure, it was time to gather some facts! This step was the simplest. It involved scraping a bunch of sites for some random facts, and then converting that to an object I could stick in an array. Opening up the console, the snippet I used to scrape a site was something like this.
copy(
    [...document.getElementsByTagName("p")].map(e => {
        return {
            text: e.innerText,
            source: window.location.href
        }
    })
);
This would look at the page and get all the tags containing facts, in this case all the <p> tags. Then, it would add the innerTexts and the current page’s URL to an object, and stick it in an array. Once that’s done, I can automatically copy the array of objects to my clipboard using the copy() function and collate them in a facts array in a file called facts.ts.
After all my work, fact.ts then looked like an array of facts filled with objects like this.
const facts = [
    {
        text: "The name Jeep came from the abbreviation used in the army. G.P. for 'General Purpose' vehicle.",
        source: 'https://www.djtech.net/humor/useless_facts.htm',
    }
]

export default facts;
The facts were in facts.ts and the code was in index.ts to make my code cleaner. This meant I had to imported the facts array into my index.ts file.
Although my editor can infer the shape of a TypeScript object, it could also be explicitly defined using an interface, like this.
interface IFactObject {
    text: string;
    source: string;
}
Pretty simple!
Step 4: Endpoints Are Only the Start
For this projects, I’d have two endpoints: /fact/:index, which would get a fact at its index in the facts array, and /random, which would fetch a random fact. Both endpoints would return JSON when called with the right parameters.
The first step would be to define how to get a fact at an index, and then a random fact.
// Get the total number of facts
const factCount = facts.length;

const getFact = (index: number) => {
    // Get fact at index
    const fact = facts[index];

    // Return destructred fact with index
    return {
        index,
        ...fact,
    };
};

// Get a random fact
const getRandomFact = () => {
    // Generate random number between 0 and facts.length - 1
    const index = Math.floor(Math.random() * factCount);

    // Get fact at index
    const fact = getFact(index);

    // Return fact
    return fact;
};
getRandomFact() simply picks a random index in the array, and then uses getFact() to return the fact and its index in an object.
The two endpoints are very simple to implement, once you’ve got an Express instance app set up.
Implementing /random involved simply fetching and returning a fact. res.json() simply makes sure the fact is returned with the right MIME type.
// Fetch a random fact
app.get('/random', (req, res) => {
    // Get a fact
    const fact = getRandomFact();

    // Return the fact object
    res.json(fact);
});
Fetching a fact by index was a little more complicated. This involved parsing the input for an integer. If the supplied index wasn’t a number, the endpoint would redirect to /random to fetch a random fact. If it was a number, but out of the array’s bounds, then the function would return a text error. Otherwise, it’d return the fact with that index.
// When fetching a fact by index...
app.get('/fact/:index?', (req, res) => {
    // Extract index paramater and convert to integer
    const { index } = req.params;
    const indexInt = parseInt(index);

    // If the index is not an integer
    // (so, undefined, or has text)...
    if (isNaN(indexInt)) {
        // Redirect to a random fact instead
        res.redirect('/random');
    } else {
        // Try to get the the fact
        const fact = getFact(indexInt);

        // If the fact is not undefined,
        // (and in the array's bounds)
        if (fact !== undefined) {
            // Send the fact
            res.json(fact);
        } else {
            // Send error
            res.status(404).send(`Fact #${index} not found.`);
        }
    }
});
I’m considering switching to unique IDs versus indexes, as I may want to shift the order of the facts or I may need to delete if they turn out to be incrediblt misleading. Also, I may want to adopt a JSON structure for errors, so applications can parse them more consistently. That being said, it’s a small side project so I won’t put too much effort into making it production-quality.
Step 5: A Puggy Webpage
After this, I used the Pug templating engine to slap together a quick website. I styled it using Bulma and grabbed a good-looking serif font, Shippori Mincho, off Google Fonts.
Using a templating engine allowed me to dynamically generate HTML which included the fact, its index and its source on the server-side whenever a request was made to /.
After defining a view in views/index.pug, and including some CSS in view/css/index.css, the final Pug template looked like this.
doctype html
html(lang='en')
head
  meta(charset='utf-8')
  meta(http-equiv='X-UA-Compatible' content='IE=edge')
  meta(name='viewport' content='width=device-width, initial-scale=1')
  meta(name='description' content='Enjoy a random fact on every refresh. By Leo.')

  link(rel='stylesheet' href='https://fonts.googleapis.com/css2?family=Shippori+Mincho:wght@400;500;600&display=swap')
  link(rel='stylesheet' href='https://unpkg.com/bulma@0.9.0/css/bulma.min.css')

  style
    include ./css/index.css

  title Facts Nobody Asked For

body
  section.hero.is-fullheight.is-black
    div.hero-body
      div.container.has-text-centered
        div.column.is-6.is-offset-3
          h1.has-text-weight-light
            span.is-size-4.is-uppercase
              | Fact ##{index}
            span.is-size-5
              |  from
            span.is-size-5.is-italic
              |  #[a(href=source) here].
          h2.fact.is-size-2.has-text-weight-semibold.mb-4 #{text}
          h4.is-size-6 An #[a(href="https://github.com/leoriviera/facts-api") open source project] by Leo. Call the endpoint #[a(href='./random') /random] to get one of #{factCount} facts.
It took some tinkering to get the theming right. However, as all computer science students, myself included, are sunlight-hating gremlins, I went easy on the eyes with a dark theme on the webpage.
The index, text and factCount variables are passed into the template from Express. This is shown below.
app.set('view engine', 'pug');

// On request to '/'...
app.get('/', (_, res) => {
    // Get a random fact
    const fact = getRandomFact();

    // Render index.pug with fact data and number of facts
    res.render('index', {
        ...fact,
        factCount,
    });
});
I chose Pug because it was the easiest to integrate with Express and appeared to be the fastest to get started with! I found it very easy to convert from some HTML I designed into a Pug template, and then build on that to come to the final my design. Once you get into it, the syntax is incredibly easy to grasp. The only downside is, despite being around for quite some time, there don’t seem to be many forum or support articles on the Internet for it.
Step 6: Hello, World!
Deploying to the Internet was really simple too. Although I prefer GCP and Firebase Functions for work projects, and I use AWS S3 to host my podcast, I had some DigitalOcean credit left over and wanted to use it up.
I spun up a DigitalOcean droplet, cloned my public repo and pulled any changes as I added the finishing touches on my laptop. After installing Node and npm, and then installing all the dependencies using npm i, I kept the app running using pm2, set up nginx as a reverse proxy.
Finally, I added a domain I had lying around (yes, I have those) to DigitalOcean and then used certbot to configure HTTPS certificates and redirects. Easy peasy!
Closing Thoughts
The project was simple to get off the ground, and I’m happy I got it put together. My proudest product is my site, because I didn’t think I’d do the design as well as it came out. I have switched over to a more appropriate domain, and you can take a look at it at thefact.space. Tell me what you think!
A few ideas for improvements include
- Building in image and text endpoints
More consistent error handlingWell, that’s done, now! It’s not perfect, but an error now returns a JSON object with the index and some error text.- An About Page of some sort
- IDs for facts
- An automated fact scraper!
- An automated pipeline on my droplet on
git pull, probably using theupdategit hook.
Feel free to shoot me an email if you have any questions. If you’d like to view the source, it’s here.